
How to Assess Surf Conditions (S.W.O.T Method)
A simple framework to read the ocean before you paddle out
If you’ve ever shown up to the beach unsure whether it’s a good day to surf — you’re not alone.
Reading surf conditions can feel overwhelming at first. Forecasts, wind, tides… it’s a lot.
That’s why we use a simple framework at Dawn Surf Co:
S.W.O.T — Surf, Wind, Obstacles, Tide
Once you understand these four elements, you’ll be able to quickly decide whether it’s a good day to paddle out — especially along the Torquay and Anglesea coastline.
S — Surf (Height & Period)
This is the foundation. How big are the waves, and how powerful are they?
Wave Height
There are two ways wave height is described:
Back of the wave (surfer scale)
Face height (what you see standing on the beach)
The face is typically about twice the height of the back.
So:
A 3ft wave (back) = roughly 6ft face
Beginner guideline:
Stick to 3ft or smaller (back height) conditions.
Wave Period
Period is the time between waves (in seconds).
Under 8 seconds → weak, messy surf
8–10 seconds → average
10+ seconds → clean, powerful, organised waves
As a rule, 10+ seconds is what you’re looking for
Side Note: Multiple Swells
Storms out at sea generate waves. When there are multiple storms, you can get:
Secondary and tertiary swells
Waves coming from different directions
Uneven timing between sets
This creates:
“Double ups” (waves combining into bigger ones)
Harder-to-read conditions
⚠️ These conditions are typically not beginner-friendly
W — Wind (Speed & Direction)
Wind is often the difference between perfect waves and a messy ocean.
Ideal Wind Conditions
No wind (glassy)
Light offshore wind (blowing from land out to sea)
These create smooth, clean, well-shaped waves. These typically occur earlier mornings.
Wind Speed
Below 20 km/h → generally manageable
Stronger winds → choppy, broken waves
Wind Direction (Surf Coast)
Along the Torquay–Anglesea coastline:
✅ Northerly winds = ideal (offshore)
❌ South-westerly winds = worst (onshore)
Onshore wind:
Pushes waves over early
Creates lots of whitewater
Makes conditions harder to surf
O — Obstacles (What’s Around You)
Rips (Currents Moving Out to Sea)
Rips are one of the most important things to understand as a surfer.
They are currents of water moving away from shore, and while they can feel intimidating, they’re actually very predictable once you know what to look for.
How to Identify a Rip
Look for:
Darker water → deeper channel
Surface ripples → water moving outward
Less whitewater → waves aren’t breaking there
In simple terms:
If waves are breaking either side, but not in one section — that’s likely a rip.How to Know If You’re in One
You’re paddling but not getting closer to shore
You’re standing, then suddenly in deeper water
You feel yourself being gently pulled out the back
How to Get Out of a Rip
Don’t fight it by paddling straight to shore.
Instead:
Paddle parallel to the beach
Head towards the whitewater (breaking waves)
The waves will help push you back in
How to Avoid Them
Before entering the water, scan the beach
Once you’re in position:
Pick a landmark on shore (tree, building, car)
Keep checking your position
Paddle to stay in place
Awareness is your best defence
2. Crowd
More people = fewer waves
Mixed abilities = higher risk
Look for quieter areas where you have space to learn.
Beginner Guide
Stick to beginner-friendly beaches when starting out.
More advanced spots often require:
Better ocean awareness
Stronger paddling ability
Understanding of surf etiquette
Localism
Every surf spot has its own community.
Show respect by:
Picking up your rubbish
Giving others space in the water
Following basic surf etiquette
Parking considerately (don’t block access, driveways, or take up more space than needed)
A little respect goes a long way and it makes the experience better for everyone.
3. Ocean Floor
Sand (Beach Breaks)
These are more beginner friendly as it is easier to walk around and doesn’t require as much paddling.
Softer underfoot
Can create flash rips due to shifting sandbanks
Reefs & Point Breaks
These are for more advanced surfers, confident paddlers and have a good awareness of the conditions, etiquette and risks.
More consistent waves
Defined take-off and paddle zones
Harder surface → requires confidence
4. Wildlife Awareness
Look for signs of fish activity:
Birds diving into the water
Fishermen nearby
Activity near piers or rocks
These can attract larger marine life.
Sharks in Victoria are very uncommon, but awareness is always important.
T — Tide (Timing is Everything)
Tide changes how waves break and how the ocean moves.
Low Tide
Shallower water
Waves tend to be more powerful and defined
Often better shape
Currents are typically weaker
High Tide
Deeper water
Waves are slower and softer
Can help if waves are closing out too quickly
Local Insight (Torquay & Anglesea)
Most local spots around Torquay and Angelsea typically work best on Mid to low tide. Every beach is different, your local surf shop will happily help you out.
Important to Know
Tide times shift by ~45 minutes each day
Tidal range changes throughout the year
Larger tidal swings often occur around seasonal transitions
Forecast Tools
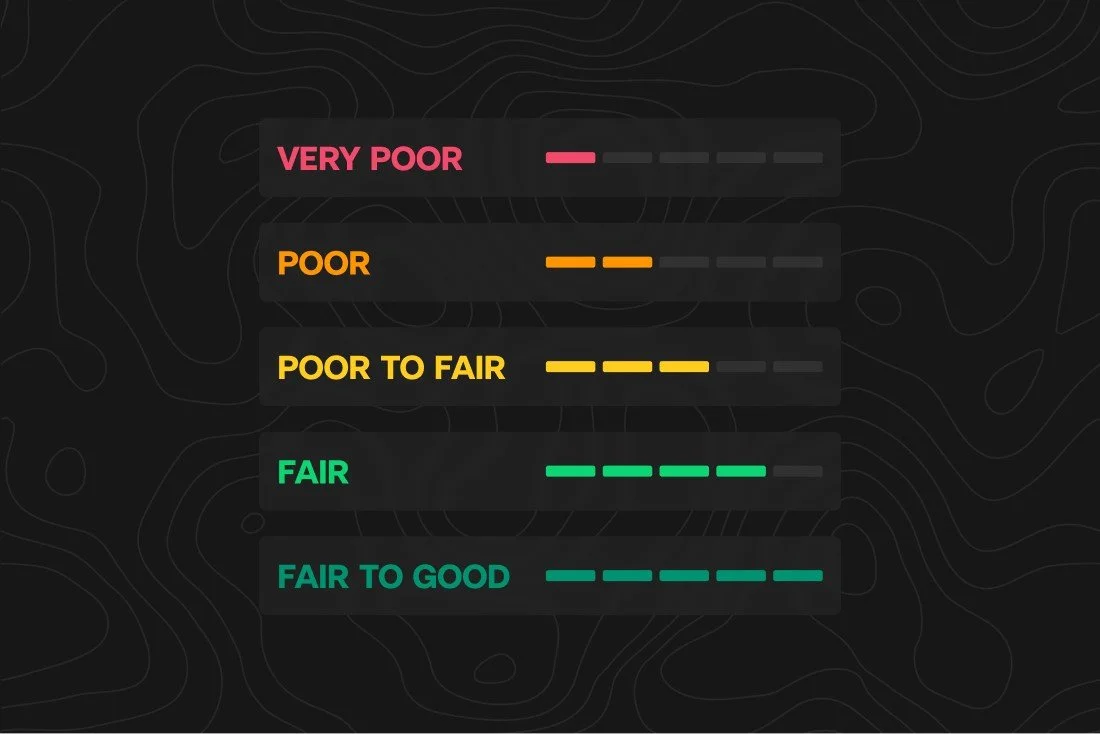
I personally like to use a combination of Surfline and Swellnet:
Surfline
Surfline has a simple rating system, which I find easy to understand, it means you don’t need to be a meteorologist to know when it’s good to surf.
Premium gives you access to the long range (16 day forecast) but this can frequently change. Forecasts are typically only reliable within about 3 days.
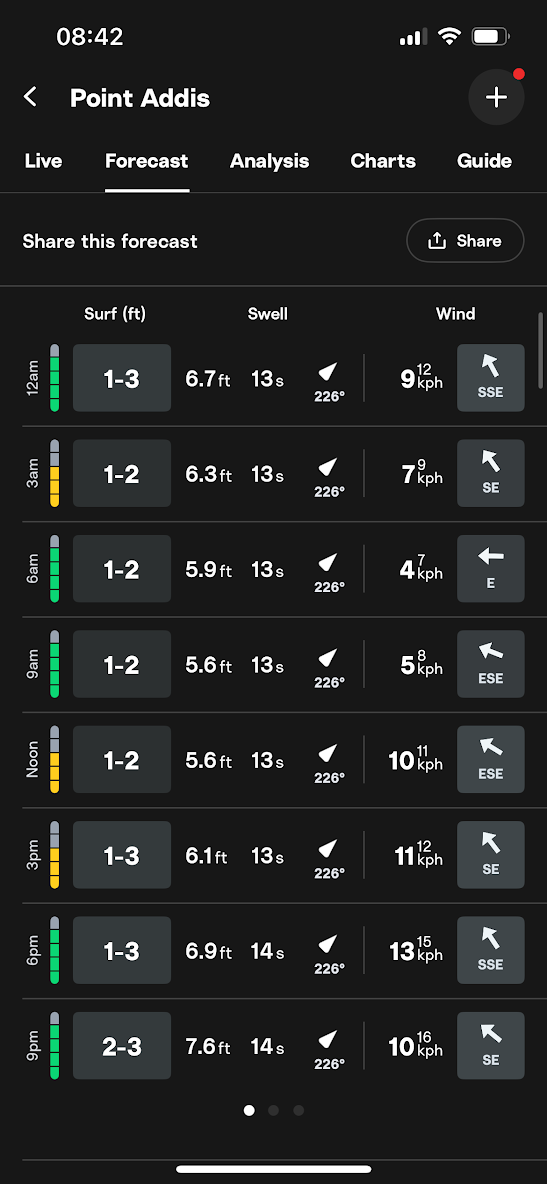
Swellnet
Great for local surf cams
Lets you check real conditions before leaving home
Final Takeaway
If you’re ever unsure, come back to this:
Good surf = Clean waves + Light offshore wind + Safe environment + Right tide
Or simply:
S + W + O + T = A good session
Want help reading the conditions in real time?
At Dawn Surf Co., we choose locations each day based on exactly this framework — so you don’t have to.
If you’re just getting started, we’ll guide you through it in the water so you can build confidence faster.